

Box elder board carved with William Morris’ quote: “Have Nothing in your house that you do not know to be useful or believe to be beautiful.”
Every project is another opportunity to learn, and I’ve learned a lot while lettering. Carving this large box elder, a.k.a. ash-leaved maple, board (30 5/8″ x 12 1/4″ x 1″), just finished, reminded me of some of the differences between carving large pieces and relatively small pieces. The most noticeable distinction is that smaller pieces can be manipulated with the non-knife hand (I’ve written some posts about my pen-knife lettering, including this one). In fact, I’m usually rotating the bowl or spoon more than the knife. That doesn’t work with a big board like this.

The size of the letters and the hardness of the wood can also call for me to adjust my methods. The letters in “useful” are roughly three inches high. Unless the wood is very soft, letters this large require more than a penknife. So I excavate most of the material with carving chisels, then refine the sidewalls with the pen knife and skew chisel, among other tools.

As with bowl carving, the refinement stage takes me much longer than the roughing stage. I’ve learned to take off my watch and put the clock out of sight during these sessions.
I want to use some other recent lettering projects to share a few things I’ve learned:
On most pieces I letter, I can’t transfer a sketch directly from paper to wood, because the surfaces I’m lettering aren’t flat. The handles of bowls, for example, are usually convex in both directions. Paper would just wrinkle and bunch. I often work out some planning sketches on paper, then draw the letter outlines directly onto the wood.

Lettering on sculptural pieces usually requires drawing of the lettering directly onto the wood.

For lettering on a flat surface, I’m able to work out the final design through a series of sketches on paper, then transfer to the wood with graphite paper. Still, I’ll make some final adjustments on the board itself.
Going through the designing and carving process has also taught me to keep the eventual execution in mind while I’m drawing. I know very little about names for fonts and typefaces and all that, but I know that some are better suited for carving than others. Design with the medium and method in mind.

Here’s a very different application of lines and lettering. For relatively thin lines like those carved on this cherry bowl bottom, the knife alone does the job, even in woods that are pretty hard. Same idea with lettering on spoon handles and such.
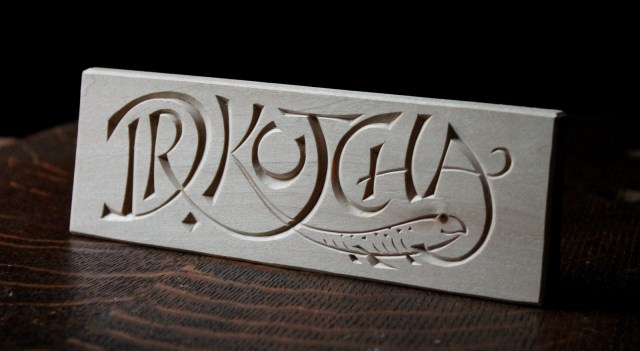
And the penknife still works well directly with somewhat larger letters in relatively soft timber. The letters of this fun nameplate were carved in basswood with the knife.
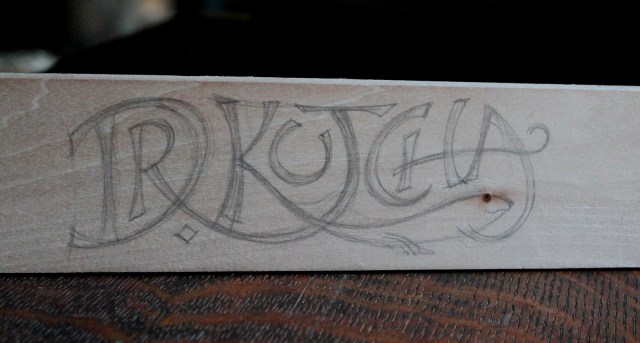
Just make sure, at this stage, that you’ve spelled the name correctly. It’s Dr. Kuchta! Oops. I learned that’s it’s easier to erase pencil than carved lines.

Another example is the lettering on this shrink-book. It’s a rectangular shrink pot in the shape of a book with a sliding lid. Made for my daughter, the line is from one of her favorite movies, the film version of The Secret Life of Walter Mitty.


It would have been much more challenging to carve all that lettering directly with the knife in a harder wood, but it worked well in this aspen.

The carving on the underside of the small lid would have been very difficult to complete if the lid was secured to a bench. It’s the dance between the off hand and the knife hand that makes the carving a pleasure to execute.
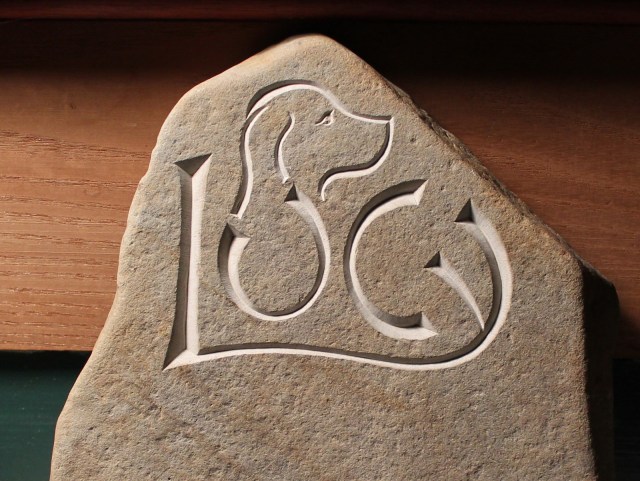
Of course, letter carving in wood offers constant lessons in adjusting to the grain of the wood. Not necessary with stone. I’ve only done a few experiments in stone, including this one in remembrance of a friend’s dog.
My brief experience has taught me that executing a carving in stone is different from working with wood in many ways, but the design considerations are much the same. In fact, some of the best books about letter carving focus on work in stone — but can teach a lot even if wood is your medium. One of my favorites is The Art of Letter Carving in Stone by Tom Perkins — packed with insight and inspiration.
I’ve got a lot of exciting things to learn — back to carving…

Oh my, that box elder is stunning–I mean, with your lettering incised in it. You give me a standard which I aspire someday to reach.
LikeLiked by 1 person
Thanks, Nancy. I felt the same way when I saw your incredible Arts and Crafts Sideboard in the November Pop Wood!
LikeLiked by 1 person
David, you leave no stone unturned in this expose of letter
carving. Masterful!
LikeLiked by 1 person
Many many THANKS David!
I’ve long admired your lettercarving (and of course, all the rest). My own lettercarving has always been done with carving chisels, and well within the boundaries of specific fonts. Yours are more fluid and lively. Reading your thoughts on using knives is driving me to go experiment. THANKS for the inspiration!
LikeLike
Bob, thanks for the link to the post about the “gratitude” carving. Beautiful work and described in detail. I particularly found the gilding information interesting and helpful. Wonderful.
LikeLike
I LOVE these!!!
LikeLiked by 1 person
For some reason I expected a dry treatise on letter carving, I should have known better! I can’t believe how crisp all the letters are. The book box is stunning, even before the letter carving and paint, my jaw dropped when I saw those images and I just stared at them for several moments.
I should commission you to carve my grave stone, so that I can enjoy while still alive! 😀 [Which reminds me of an American leather crafter who needed a large flat marble slab to skive on and managed to get a good deal on a grave stone, which he figured would do double duty! The story is true, I saw a picture of his workbench with the gravestone flat on it!]
LikeLike
Thanks. Interesting story about the gravestone. I’ll get started on your stone; could make a nice kitchen island for awhile!
LikeLike
I have been reading this article over and over. I can’t wait to learning more about lettering. Very fun article Dave. Some many interesting examples of the craft.
LikeLiked by 1 person
Great article. Can you tell me what the style of letters is? I just love it and would like to learn how to do it. Thanks for sharing. Mike
LikeLike
Thanks. The general style of the lettering in each example is a v-inscribed letter, so carved below the surface of the wood (as opposed to lowering the background to create “raised” lettering). As far as the style in terms of a font, I have no idea what one would call it. I’m not really using any font or anything as a guide. I’m just drawing letters, shooting for graceful lines and nice curves. Sometimes I’ll do styles that differ from the general feel of the ones in the examples above. For example, on this frame, The letters are closer to the Roman tradition, but with my own messing around very evident: https://davidffisherblog.wordpress.com/2017/05/04/framed/
As far as learning how to do it, I use somewhat different techniques depending on the circumstances. I’ve discussed some of this through the blog. Check out the “lettering” topic from the pull-down menu to the right. Someday, I’d like to get things organized to more formally explain how I approach the lettering. Meanwhile, there are books available that will set you up with a good foundation. I’d recommend Chris Pye’s book Lettercarving in Wood as a good start.
Most importantly, dig in to some wood and give it a try. You’ll have a blast, even if you get frustrated at times. Seems like such a straightforward thing — just cut a v into the wood — but I continue to find it challenging and fascinating.
LikeLike
Thanks Will start working in wood. Will also review you posts.
LikeLike
Pingback: Lettering Large | David Fisher, Carving Explorations
Pingback: Shrink Pots, Paint and Lettering | David Fisher, Carving Explorations
Just wanted to thank you for sending all these written posts out. Very nice and very motivating. I am a woodcarver from Pennsylvania ________________________________
LikeLiked by 1 person
I appreciate that, Steven. Happy carving!
LikeLike