

At last month’s Plymouth CRAFT Spoon Day, I saw Oliver Pratt’s cool wooden axe sheath. It worked by pinning a wedge in place that secured the sheath. Oliver had seen the concept somewhere and had created his sheath by chopping a long and deep mortise into the edge of a board. After praising Oliver, I made a quick sketch of the general idea.
Back in my shop, I went about making one by laminating together three thin boards to achieve a snug fit. I didn’t take any photos while making it, but the woodworking part is pretty straightforward. The key is the layout. Here’s how I went about it.

Trace the outline of the axe head portion to be sheathed onto a piece of paper.

By the way, these “My First Ticonderoga” pencils are my new favorites for green woodworking. Although they’re marked as #2, the graphite mix is dark and marks easily. It also seems to be a bit water soluble. Best of all, the barrel is a fat 3/8″ diameter with a thick lead. The lead is far less likely to break internally after falling or getting knocked around. And the bright yellow color jumps out on a cluttered workbench.
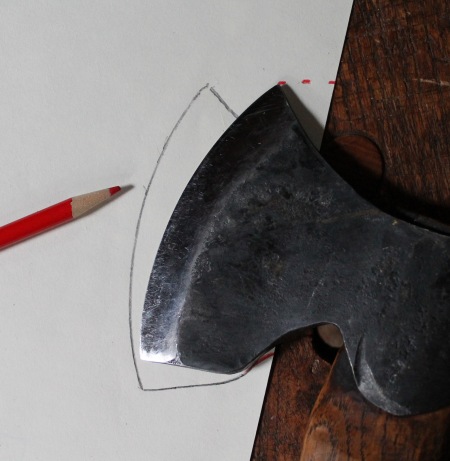
Now treat the pencil outline as the interior of the eventual sheath and go through the motions of rotating the beard of the axe into the sheath. At points along the way, stop and mark the furthest extent of the upper corner, or toe, of the axe head (the red marks in my photo). This line of these marks indicates the clearance required to get the axe head into the sheath. All of these shapes and lines will be specific to your axe head, but the same general procedure should work.

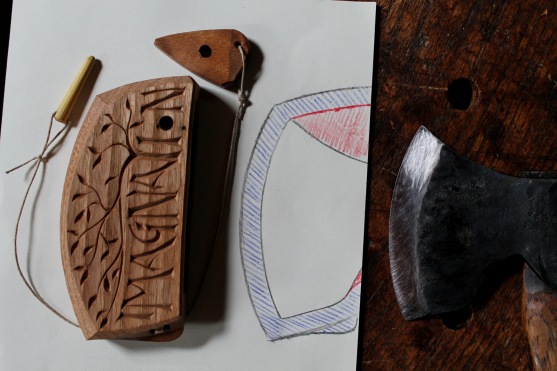
Connect the red dots and the shaded red area at the top will be the exact shape of the eventual wedge that secures the sheath. You can see how the axe would be locked in place with a wedge in the red area. The little area of red at the bottom will simply be relieved to make it easier to sneak the axe in at the bottom without requiring as large of a swing at the top.

Sketch on the shape for the outer perimeter of the sheath. I’ve left a bit extra at the bottom for attachment of the wedge and pin tethers.
I resawed and planed a butternut board down to a heavy 5/16″ (8 or 9 mm) thick. It can be crosscut into three lengths long enough for the sheath. My finished sheath is about 3″ wide and 6″ long, but ideally the rough lengths of the three pieces, especially the middle one, will be a bit long at this stage for strength before the glue up.
Transfer the outline of the interior hollow onto the middle board (the line just inside the blue areas, including the white and red). With a coping saw or other means, cut the shape of the interior. Do not cut the exterior shape of the sheath (outside the blue area) at this point.
Using glue, sandwich the middle board between the solid outer boards. The overall thickness will now be about an inch. Once the glue has cured, transfer the outer perimeter line to the sheath sandwich and shape it accordingly.

Using a piece of the same board material, cut a wedge corresponding to the upper red area in your paper template, leaving a bit sticking out as a little handle. With the axe and wedge in place, bore a hole through the sheath and wedge for a wooden pin. I reamed the hole to a slight taper and trimmed the pin to match. That allows for a secure pressure fit, but a tight-fitting straight pin would work too.
With a few gouge cuts, I carved away some of the interior walls of the sheath near the back to allow for the thickening portions of the cheeks of the axe head.
There are many possibilities for wooden sheaths. Just use your — imagination.

Beautiful, Dave! Thank you for sharing this. I plan to start my own this weekend….
LikeLiked by 1 person
Likewise, what a novel idea!
LikeLiked by 1 person
I like it!
My axe has a cover, but this gives me ideas for my adze and big scorpsYbo.
LikeLiked by 1 person
I’ll be interested to see what you come up with for a wooden adze sheath, Jed. I made a prototype one for a friend’s adze recently (that doesn’t work on the same holding mechanism as the axe one in this post), and when I get a chance, I’ll make one for mine.
LikeLike
Ignore the ybo. Not intended
LikeLike
I made a wooden edge-guard for my father-in-law’s 4lb Brades Kent-style axe after sharpening it for him earlier this year. It wasn’t as pretty as yours but it worked well. I used a single piece of wood and cut a slot for the axe using an old pig-sticker mortice chisel. The guard is secured to the head by a length of stretchy bicycle inner-tube, secured to the guard by wood screws with washers; the rubber band stretches of the axe-head to secure it. It works well.
LikeLiked by 1 person
That’s a good idea, Anthony. Thanks. Keeping the cutting edge pretty is the main thing, and I’m sure the inner tube attachment is fast and secure.
LikeLike
This is fascinating Dave. I never tire of seeing your work and especially your lettering skill/style with the tree inclusion. Thank you for sharing.
LikeLike
Thank you for the great inspiration! I’ve done the mi first wooden sheath with sych technique, but it is only the first one of a long series! Thank you very much!
LikeLiked by 1 person
Pingback: Best 17 how to make an axe sheath – hkfindall.com