

I want to say there is nothing
like the sudden opening of wood,
but it is like so many other things —
Billy Collins, Splitting Wood
A few days ago I split a cherry log into rough blanks for future bowls. I snapped some photos of the process.

This black cherry log was about twenty inches in diameter and four feet long. Not wanting to make any four-foot-long bowls, I crosscut the log into two sections, a shorter piece (to the right) for some ale bowls and a longer piece to the left for various others. I also cut a couple inches off the painted ends of the whole log to get to fresh wood and get past any end checks.

The dark spot in the middle of the log is decayed wood, present while the tree was still standing. I have a few ale bowls to make, so I struck some circles with a compass after studying the end grain carefully for both pattern and any checks.
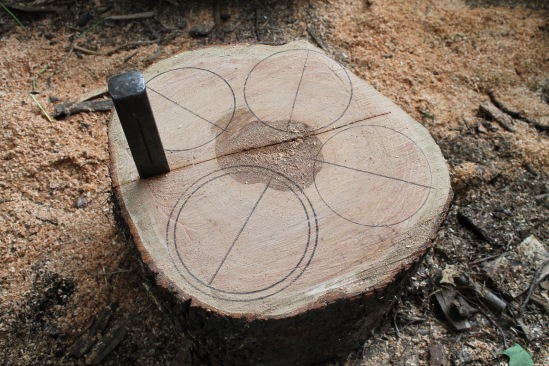
Scoring a line by tapping a wedge down a line into the end grain helps ensure that the split will run where intended.

Then a few wedges driven in along the line start to open things up. Short lengths like this (14″) are usually no problem at all. I really need to grind back the splayed tops of some of those wedges. Those extended bits of metal can fly off when struck with a sledge and go who-knows-where.

The sections for each ale bowl are isolated.

Then I split away excess with a froe.

Some of those split away pieces become spoon blanks.

On this shot of the longer log section, an existing split is visible running left to right, so a decision has been made for me.

Wedges get it going…

…but these fibers crossing the gap are holding the long halves together.
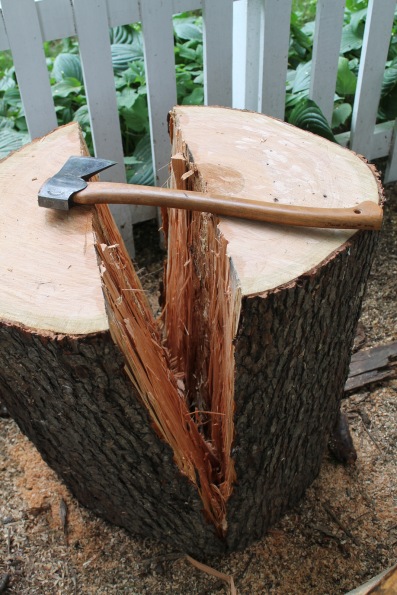
An axe can get in there and sever them, allowing things to open up.
Sections A and B could be used for some small bowls with quarter-split vertical grain. Section C will be a long, wide bowl with a flat rim. Bowls from sections D and E will be carved with the bark side up and crosscut again. That’s the plan anyway.
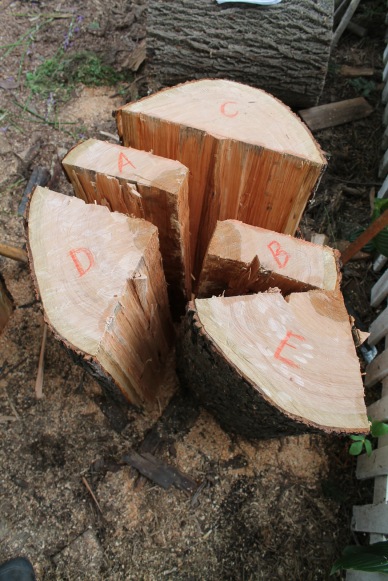
Here they are all separated.

I removed excess with a froe from D and E. The flat area created by the froe roughly forms the bottom surface of the future bowls.

Here I’ve split away the future bottom side of section C. With much more mass on one side, those splits will run out, but working from both sides helps to even things up a bit, leaving less wood to hew away later.
It will take some time to get to all of those chunks of cherry, so they’re all in plastic bags until then.
Returning to Billy Collins… enjoy this hilarious and wonderful presentation he delivered on Ted, and this one too!

Thanks for sharing your thoughts with this part of the process, fascinating to see how you use all the wood. How long can you keep those pieces ‘green’ in the plastic before they go past their use by date?
LikeLike
Black cherry is pretty decay resistant, so quite awhile — depending upon the temperature, etc. With cold winter temperatures, very little decay occurs if at all. Hot summer days can get things brewing in there, but the only issue with cherry may be a little surface mold that I just shave off. Those pieces will certainly be fine in there for a few months more, but if I get concerned I’ll just rough out the pieces then wait until whenever to do the dry carving stage. Consider also that, although I don’t know exactly how long ago the tree fell, it was at least a few months ago.
LikeLike
Thanks for taking the time to answer all our questions, it’s much appreciated. I hope this doesn’t impinge too much on your work.
LikeLike
Cherry is my favorite so far. It seems like such nice wood to carve, and I think you have shown how nice it splits also.
After placing in plastic bags are you freezing as well?
How long do they last for you in just plastic.
It seems cherry can sit a while longer than other species, because of the great carving characteristics I have in mind.
LikeLike
If I only had a big enough freezer, Emil! My yard will be my freezer come December. You can see in my reply to Rob the answer to your other question.
LikeLike
I am really impressed with the amount of hard work to finally get to the absolutely refined bowls you are making. Which shows that art does not pop up without lots of thought and effort. Thank you for sharing.
LikeLiked by 1 person
Thanks, André. I like the mix of the rougher, more physical, early stages and the later parts. Indeed, much is determined about the finished product from the first strikes on the wedges.
LikeLike
Dave, it’s a good lesson to see how you split the log out in order to utilize every bit possible for bowls and spoons. I look forward to seeing the end products.
LikeLiked by 1 person
Thanks, Scott. If it’s cherry over the next few months, it will have been from that log, with the exception of a few spoons and small things.
LikeLike
It’s nice to see how little goes to waste. More shallow bowls, spoon blanks, etc.
LikeLike
It is nice when it works out that way, as with this log. And those pieces may still hold unpleasant surprises! I do like the challenge of thinking creatively about what a piece of wood has to offer, but It’s pretty common for many logs to contain a lot of firewood. Even that isn’t waste as it will warm our home in the winter.
LikeLike
Just when I was thinking how nice a four foot long bowl would be…
Great post, Dave. Thanks for sharing. Looks to me like you had a whole lot of fun.
LikeLike
I’m picturing communal soup-eating at a big family meal.
LikeLike
With maybe a four foot long ale bowl!
LikeLike
Thanks Dave. I find this part of the process particularly enjoyable and visually appealing. It is interesting to see how you split up the large diameter log. For bowls, I think I have only ever split logs in half. I split logs more finely for firewood and shakes, so odd that it hasn’t occurred to me to do likewise before (and I have Jogge Sundqvist’s book which also illustrates the splitting a log into different areas for: chopping boards, stool seats, bowls, shrink pots, etc.). Perhaps it is because I have concentrated for too long on big bowls. I am only now beginning to appreciate the joy and practicality of smaller bowls. You earlier “roof” profile bowls & 2 porridge bowls from 1 blank started me thinking about this more but I have yet to act on it. But I feel inspired now. 🙂
LikeLiked by 1 person
Another THANK YOU Dave… I just pulled a cherry bowl blank out of the freezer, it has been there for a few months. I guess I am not as efficient as you are with processing the log so I find the freezer a big help in storing the blanks. What about that froe? I have tried my froe to help take away the waste wood. It works ok with softer wood like birch. Yet, with cherry I find I can’t get through the wood. I have a Lie-Nielsen froe, from the Langsner design. I have not tried to sharpen it as when it came to me. Any thought about froe sharpening, or design features for this bowl carving with harder woods?
LikeLike
The freezer is great to use, Paul. I just don’t have a big freezer with space for much wood.
You certainly don’t want, or need, your froe to have a sharp edge like an axe. The edge of a froe is meant to slip between, and wedge apart, wood fibers. It just needs to have an edge tapered well to a relatively fine edge so that it bites. I’ve never sharpened mine in over a decade. The idea is not to drive it through the wood, rather just enough to drive the blade into the wood, after which, it becomes primarily a levering tool. By pulling or pushing on the handle the two halves are pried apart. For large logs or wood resistant to splitting, the levering action may not be strong enough to achieve the split, in which case wedges are called for until the pieces are smaller. The froe I use is the Langsner froe, purchased before Lie-Nielsen took over production. Looks to me to be essentially the same, but I haven’t seen the details of the grind. There are all sorts of subtleties to using a froe effectively for riving long lengths of wood with control and finesse. I’m a hack when it comes to that. Guys like Curtis Buchanan can really get the most from what a froe has to offer.
LikeLike
Pingback: Three Bears’ Bowls | David Fisher, Carving Explorations
Pingback: Breakfast for Five | David Fisher, Carving Explorations
Pingback: Summer’s Calling | David Fisher, Carving Explorations