With my “Bottoms Up” post a couple weeks ago, there was a comment/question about what I use to do the lettering and date. I thought I’d elaborate more on the answer in this post.
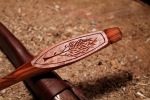
In the photo above, I’m using the grip and knife with which I do just about all small lettering and incised decoration, especially on spoon handles and bowl bottoms. Whether for the lines of a letter or a tree branch, the method consists of making two slanted cuts that meet at the bottom to form a v-cut. Sometimes I will vary the grip a little, raising the blade more for tighter curves. Regardless, I always pull the blade rather than push it. I use the movement of my shoulders rather than fingers to do the work, and the spoon moves as much as the knife. They are like dance partners.
Other knives will work as well, pocket or otherwise. I think the key is the slight curve at the tip of the cutting edge. This allows the blade to track more smoothly and ease out of cuts. I like the pocketknife because it fits right in to the outer web of my thumb and forefinger. My knife is 3 1/2″ long closed and 5 1/4″ long with the pen blade open. Plus, it is always right there in my pocket. The blade will not be sharp enough new. I reduce the bevel angle to a very fine edge, and strop it.
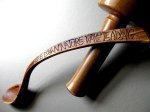
Here are a few examples of incised decoration and lettering I’ve done with that same knife. Click on the photos for an enlarged view.
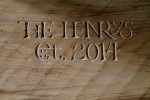
 For lettering that is a bit larger, I’ve been messing around with an adjusted blade in a utility knife. I ground a shallow curve into the thin blade then sharpened it (see the photo to the left). I can put more “oomph” behind this blade. I’ve included photos of a bench (elm seat, oak legs) that I made last year with the incised carving on the bottom done with the adapted utility knife.
 For larger and/or more formal lettering, I usual use traditional carving chisels. Chris Pye wrote an excellent book on such lettercarving in wood.
The more I learn the more I realize how little I know. In our age of computer generated, machine cut inscriptions, artful lettering is often overlooked. This short video of a true letter artist, Martin Wenham, asks us to pause and reconsider.


Beautiful work David!
LikeLiked by 1 person
David, What’s your process for sharpening your knife? More specifically, the curve of your knife blade.
LikeLike
B.J. — To establish the curve on the utility knife blade, I just held it with pliers to the grinder until it looked like the curve was nice. To hone the thin steel, I went to my diamond stones working through the grits. I usually find it easier to maintain a consistent angle by moving in little circular motions. Pen knife blade is the same — diamond stones, then strop. I don’t think I’ve had that blade back to stones in years. I just strop it occasionally.
With all of the curves on the tools I use, I don’t use sharpening jigs such as some use for plane irons. When sharpening many types of tools I have the tool in one hand, and the stone in another — taking the stone to the tool rather than the other way around.
LikeLike
That’s very helpful, thanks.
LikeLike
Things might be more clear now that I noticed my omission of the photo of the utility knife! I’ve corrected that now.
LikeLike
Great Posting David. Do you have a method for laying out lettering on to the workpiece?
LikeLike
Bill — In some cases, I don’t lay out anything before cutting letters, especially smaller things. Sometimes some interesting things happen when I’m not expecting it. But in most cases, I’ll play around by sketching some ideas on paper, then just write lightly with pencil right onto the wood once I know what I’m going for. For smaller letters, just a general idea marked on the wood, for larger or more formal situations, I’ll be more precise with the drawing. In cases where I’m working on a flat surface, I might get the design pretty exact on paper, rub the back with a pencil, then transfer onto the wood by going over the lines. If the pencil is light and the eraser is good, there is usually no problem with any remaining pencil marks. Most get carved away anyway.
LikeLiked by 1 person
Thanks David ,,, i appreciate the sharing of your knowledge and experience,,, mostly ,,, the wisdom of simple ,,, shared resources and sources that add that personal touch to learning for all of us,,, opening more then the door to technique,,, it gives me the encouragement to step through that door and enjoy the doing ,,, in the doing comes the revelations of the possible,,,
LikeLike
I love learning when I least expect it. I found your site by accident when I googled “what oil to use on wooden bowls”. I got 8 tree spirit wooden bowls that were never used at a garage sale for $3. I know they aren’t as amazing as yours, but they will be functional. I want to treat them right – so I am going to get some flax seed oil like you suggested. I am also going to show this youtube to my Latin students – they can learn something about art and language as well! Thanks for the unexpected surprise of learning!
LikeLike
Great to hear! Bona fortuna!
LikeLike
Pingback: A Revelation | A Riving Home
Thanks for your great post and including the Martin Wenham video. I’ve come back to this post a couple of times over the last year and have often thought about what you and Martin say. It is hugely inspirational and thought provoking.
LikeLike
Hi Dave, I bought 2.penknives recently and was surprised how similar one of them looks to yours. Although relatively inexpensive I am quite please with them, except perhaps that both have stainless steel blades – I wondered if yours has stainless steel or carbon steel blades?
For the record both are traditional penknives (in the British sense), with one small pen-blade and one larger blade, both curving to a broad tip point, not pointy and not locking, between 2″ and 3″ long – legal for every day carry in the UK (because they would be rubbish as weapons!). One of penknives is a new Swiss army penknife off ebay, £8 inc. shipping. The other an old, vintage Girl Scout penknife from Poland but made in the USA. Both arrived sharp and they are quite similar in character, I like them both very much.
LikeLike
Mine has carbon steel blades, but stainless blades can be good. It depends on the quality of the steel and heat treat. For example, I have pocket knives with stainless steel blades from Victorinox (swiss army style) and Case; the stainless blades of both brands are a little trickier to sharpen than carbon steel, but the blades hold a fine edge and perform very well. Still, I prefer the high carbon steel (or, for Case brand knives, CV-“chrome vanadium.” Quality not only gives you good steel, but also a reliable and firm spring to keep the blade open (even though not locked) and a good fit and finish. Congratulations on your new knives. Keep ’em sharp and enjoy using them.
LikeLike
Dave, that Martin Winham video is an eye-opener to just how creative one can be with letter art – amazing stuff! I can see some of his influence in your work I think.
LikeLike
You’re right, Dan. Seeing and hearing Martin in that short video really opened my eyes and got me thinking. I think he’s brilliant and definitely an influence on me.
LikeLike